Most lawns will require some amount of leveling to prepare for a playset installation, and even if you’re having installers come to build your playset, you will probably have to level the yard yourself.
Still wondering how to level a backyard playset? The most common way to level your playset is to level the ground beneath the playset using a shovel and rake to redistribute the soil. In some instances, you may need to use cement blocks under a playset or build a small retaining wall to create a level space.
Every yard is different, and the leveling needs in your backyard will be different from another person’s. Continue reading to find how out to level the ground in your particular backyard so you can put up that playset.
Related: How to Mulch A Playset
Does the Playset Really Need to Be Level?

Yes. The playset needs to be level for safety of the children playing on it and to prevent the playset from becoming damaged.
Safety
A playset that is not level could tip over while children are playing on it. Depending on the playset itself, it could blow over in a strong storm or lift up from the movement of the swings or other vigorous play.
A tipping playset can cause serious injury to the children playing on or near it.
Damage
Playsets are designed to sit level. If the playset is not built on level ground, it may be putting stress on joints, hardware, or the wood itself, that it was not designed to withstand.
Picture this: A playset with a clubhouse tower and a swing set. The outer edge of the club house and A-frame are sitting on areas of the yard that are a few inches higher than the center. This will put undue stress on the joint where the swing beam connects to the club. It is also going to result in uneven swings.
A situation like this is just one-way damage can occur to a playset that is unlevel.
Warranty
In some cases, installing the playset on ground that is not level will void the warranty because damage is more likely to happen. By insisting that the playset be on level ground, the manufacturer is protecting them self from having to fix damage to a playset that could have been prevented.
Playset Leveling Options
Most backyards are not level. In fact, a perfectly level backyard can cause drainage issues. A properly graded yard will slope slightly in all directions away from your home. This allows heavy rainwater to run away from your house instead of into it.
But that graded yard can be a headache when you’re looking to put up a playset in your backyard.
There are a number of options for leveling your playset, and each offers different advantages depending on your situation.
- Redistribute the soil
Redistributing the soil is the most commonly used option. It does not require any fancy equipment or expensive supplies. It is best used if the area is mostly level and only requires a few adjustments. However, even slight adjustments require significant time and effort.
- Install support blocks
The only parts of the playset that need to be level are the supports. You can support posts using concrete blocks or supports to add some ground height. Additionally, some companies make playset leveling blocks that can help if the ground is only slightly off level.
This is not a desirable option to some because blocks used to support playsets can become trip and fall hazards, it doesn’t usually create an appealing finished look, and it cannot safely fix a drastically sloping yard.
- Build a small retaining wall
In a yard that requires significant leveling, you may be required to build a retaining wall to keep your soil from eroding where you build up the yard and where you dig into the yard.
This option requires a lot of extra materials and work, but it can be the only option on significantly uneven yards.
- Hire a Professional
If you’re short on time, have a seriously sloped backyard, or drainage issues, you might want to hire a professional landscaper to help. The job will be done well and quickly, but it can be expensive.
Before You Start Leveling the Ground

If you chose to level the ground beneath your playset by redistributing the soil yourself, you’re not alone. This is by far the most commonly used method of creating a level finished product because it usually only costs your time, and it is a fairly simple process.
Before you begin the process of leveling the ground, you need to figure out where you would like to place the playset in your yard. You may wish to choose the flattest place in your backyard, but there are a few other factors that may influence that decision.
Safety
Your children will be climbing, jumping, and running all around the playset. When selecting the location of your playset, be sure there is enough space around your playset for safe play.
It is recommended that the playset have at least 6 feet of clear space all around it and that the swings have twice the height of the swing beam in the front of it and behind it. This means a 6-foot swing beam would need 12 feet of clear space in front of it and behind it.
For a typical playset, you’re looking at something like a 27 foot by 27-foot square. The play area for a large playset can be expansive. Many playset manuals will provide the exact dimensions needed for the play area.
Utilities
You may want to avoid building the playset over any of your utilities in case they need repair or upgrading. In addition, if you need to dig deep into the ground to level it, you will need to be careful not to damage any of your utilities.
Call your utility providers well ahead of starting to dig to have them mark where your lines are.
Visibility
The playset should be visible from your home so that you can check on your children at any time. Additionally, you may prefer to have your playset where it is not seen from the street, but this is a matter of personal preference.
Ground Cover
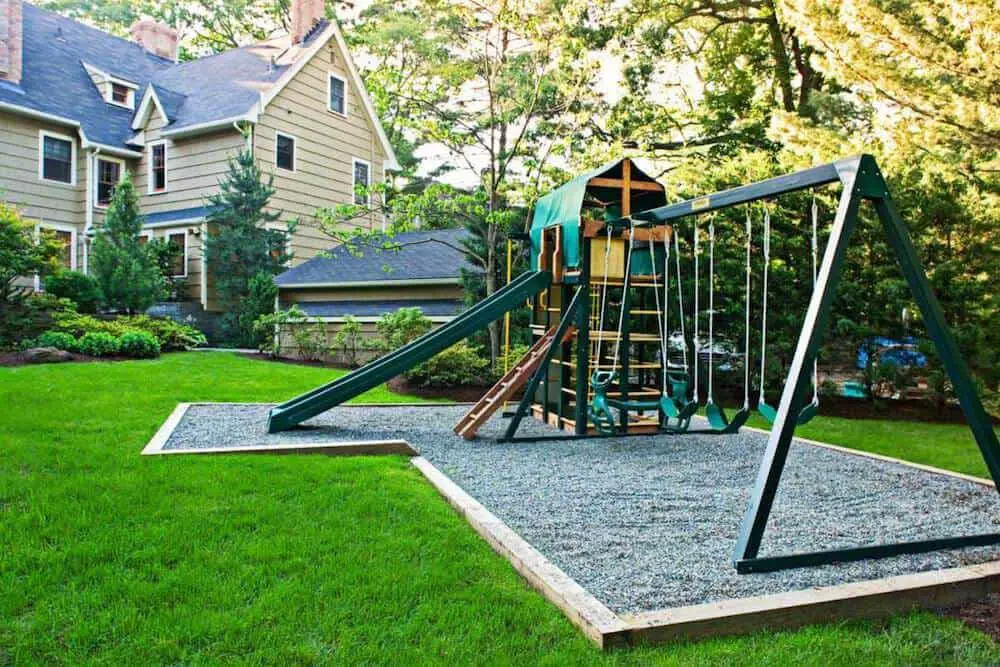
While many families chose to build their playset on grass, it is not the best options for beneath a playset. The CPSC recommends 9-inches of ground covering like mulch or pea gravel be laid out across the play area of the playset.
If you chose to use a ground covering, it will impact the amount of your yard that you must dig up in this process. The entire play area does not need to be level even if you are laying a ground covering, but many people like to make it somewhat level.
In addition, you may wish to create an edge around the play area if you are using a ground covering to help prevent the covering from taking over your yard.
How to Level Uneven Ground: The Simple Way

Digging into and redistributing the soil might be the simplest way to level the ground for your playset, but it is not the easiest. Digging up sod, removing soil, raking it out… you’re sure to work up a sweat, but a little hard work now will help make your playset safe.
You won’t need any fancy equipment to get this job done, just a few simple tools you probably already have in your garage.
Basic Supplies
Optional Supplies
- Landscape paint
- Long wood board
- Wheelbarrow
- Border spade
- Sod cutter
- Duct tape
- Hose
- Landscape fabric
- Landscape fabric pins or garden staples
Leveling the ground is a simple process. You mark the area you need to level using stakes and string, move the dirt to create a level spot, and then check if it is level. For a more detailed look at each step in the process, continue reading.
How to Use a Level
It will be nigh impossible for you to level the ground for your playset if you don’t know how to use a level. A carpenter’s level is easy to use and accurate, but if you’ve never used one before, you might be wondering exactly how it works.
A level usually has three small tubes with a yellowish liquid and an air bubble in them. The tubes are marked with two fine lines. When you hold the level horizontally, there is a horizontal tube, a vertical tube, and a tube that is at a 45-degree angle.
When you set the level on a horizontal surface and the air bubble is between the two lines, that means that the horizontal surface is level.
When you hold the level vertically and press it against a vertical surface, it will tell you if whatever you are pressing it to is plumb or truly vertical.
Step-By-Step Process for Leveling the Ground
Mark the Ground
- Refer to your playset owner’s manual to determine the size of the playset.
- Measure out the size of the playset in the location you want to put it. You could mark it out with stakes, rocks, or landscape paint.
- The area where the playset will sit should look like a large rectangle. Give yourself a little wiggle room and make the area you decide to level slightly larger than the playset.
- At the corners of the rectangle, pound wooden stakes into the ground using a mallet.
- Tie the string to the stake that is at the highest part of the yard.
- Connect the string to another stake by wrapping it around the stake a few times. It should be taut.
- Ensure that the string is level using a line level or a carpenter’s level.
- Connect the string to all the other stakes and secure it to the last one by tying it off or you can use duct tape.
- If you are going to use ground covering beneath the playset, you should also stake out the play area using the same method.
Remove the Sod

Sod is term used to refer to your grass plus they layer of dirt beneath it that is held between the grass roots.
- Moist sod is easier to remove than overly wet or dry sod. Consider watering the area using a hose a day or two before you begin digging to make your job easier.
- For efficiency, you can use the shovel or a border spade to cut lines into the sod to create a grid of 1 square foot pieces.
- Use the shovel to pry up the layer of sod. Be sure to dig in deep enough that the shovel gets beneath the roots. This is usually about 3 inches, but it depends on the variety of grass in your yard. Once you begin digging, it will become clear how deep you need to go.
- Sod is heavy. Carefully load a wheelbarrow with the pieces. Large chunks can be repurposed.
- If you plan to lay out ground covering like mulch, remove the sod from the entire play area.
- Sod can also be removed using a sod cutter, a machine that uses sharp blades beneath the grass to pull the sod from the dirt. They can be rented at most machine rental locations and will make this job go much faster.
Redistribute the Soil
- When redistributing the soil, start at the highest part of the area you wish to level and work towards the lowest end.
- Dig out the soil. You can move the soil to the lower end, or you can load up your wheelbarrow to repurpose it or discard it.
- If you are laying a ground cover, you may want to dig deeper to create a basin for the ground cover.
- Use a garden rake to push and pull the dirt around until it looks level.
Check if the Ground is Level
Once everything starts to look level you will need to assess how level it is and make adjustments as necessary.
- Measure the distance between your level string and the ground. The distance should be consistent all along the string.
- If you have a long level, you can use it right in the dirt in the middle of the area you are trying to level. Be sure the level is flush with the ground.
- If your level is short, you will need to place a long board in the dirt and put your level on top of it.
- Check all across the area you are trying to level.
- You will probably have to do this several times before the ground is level.
- Once the ground is level, you can remove the stakes.
Lay Down Weed Barrier
If you do not want grass or weed to return to this area, use landscape fabric beneath your playset.
- Unroll landscape fabric over the area, overlapping approximately 3 inches where the fabric meets.
- If the fabric does not want to lay in place, you can use rocks to hold it there while you work.
- Use garden staples to secure the landscape fabric to the ground and to prevent it from moving and gaps from opening.
The Support Block Method

The support block method takes advantage of the fact that not all the ground under your playset needs to be leveled. Only the locations where the playset touches the ground need to be level with each other.
Using a supports under parts of the playset can help level it out with less digging. Level Dry Blocks and TuffBlock are two support options that can be used with most playsets. They have the added benefit of keeping the wood off the ground where it will be more prone to rot.
Many families find cement blocks adequate for supporting their playset. A raised cement block is not the safest option for around the playset as falling into one could cause injury, but they are generally strong enough to hold up a playset.
If you use one of the support options made for playsets, then you should follow their installation instructions carefully.
If you are using a cement block, you must ensure that the ground beneath the block is level. Remove the sod and use a level to check it. In addition, the block must be laid with the widest side flat to the ground for maximum stability.
The block method is not compatible with playsets that need to be anchored to the ground.
Build a Retaining Wall
If you have to dig deep into the ground, you may need to build a retaining wall. Short retaining walls are not very difficult to tackle, especially since you’ll already have the ground dug out.
Interlocking retaining wall blocks are a new favorite for retaining wall construction because they make the process easy, they are durable, and they look great.
The process I outline below is specific to these interlocking retaining wall blocks. Landscape lumber can also be used to construct a retaining wall, but it is slightly more complicated.
Interlocking retailing wall blocks should not be used in retaining walls that are higher than 28 inches.
If you must build a small retaining wall, you should be sure that it is beyond the 6 feet of open space required around a play area.
Supplies
- Interlocking retaining wall blocks
- Drainage rock
- Paver base
- Landscape fabric
- Concrete Adhesive
- Shovel
- Rake
- Caulk gun
- Circular saw
- Masonry circular saw blade, if using the interlocking retaining wall blocks
- Hammer
- Chisel
- Safety Goggles
- Work Gloves
How Many Blocks Do I Need?

Figuring out how many blocks you need to build the retaining wall involves a little math. You might want to break out the calculator.
To figure out how many interlocking retaining wall blocks you need, first measure the length of the wall you would like to build. Divide the length of the wall by the length of the block you want to use to determine how many blocks you will need per row.
Next, you must figure out how many rows you need. Measure how high you want the finished wall to be. Divide the height of the wall by the height of the block. That number is how many rows you will have.
Finally, multiply the number of blocks per row by the number of rows to get the
total number of blocks.
It is recommended that you get about 10% extra materials just in case one is damaged while you’re building the wall.
An Example:
If you’re wall is going to be 10 feet long (or 120 inches) and 12 inches high, and you are using blocks that are 12 inches long and 3 inches high, your first row will take 10 blocks because 120 inches divided by 12 is 10.
To find the rows you divide 12 inches by 3 inches to get 4. The wall will require 4 rows.
This means I will need 4 rows of 10 blocks for a total of 40 blocks. To add 10%, you multiply 40 by .1 to get 4. This means you will need about 4 extra “just in case” blocks for a grand total of 44 blocks.
Step-by-Step Guide to Building a Retaining Wall
- Mark the location of the wall with stakes and string.
- If you have not already, remove the sod and level out the ground where the wall will be built by removing dirt from the higher areas and filling it into the lower areas.
- Both sides of the wall need to be clear to install the retaining wall properly with drainage.
- You will need to dig a trench approximately 6 inches deep that is level. Stamp down the dirt to compress it.
- Fill the trench with approximately 3 inches of paver base.
- Prepare the first row of blocks by knocking off the flange with a hammer and chisel.
- Lay the blocks without the flanges on top of the paver base and be sure they are level. This is your base row.
- For the second row, you will need to stagger the blocks, which means you will need to cut one block in half with your circular saw and masonry blade.
- Install the second row of blocks keeping the flange tight against the back.
- After you finish a couple of rows, you need to work on the drainage. Lay landscape fabric behind the blocks on the dirt side of the wall, and place drainage gravel directly behind the wall.
- Continue this process until you reach the final two rows of blocks.
- On the final two rows of blocks, use concrete adhesive on the top of the row that is already installed to keep the top rows stable.
- On the last row, cover the drainage stones with landscape fabric, and fill in with soil or ground covering.
What if the Playset is Already Built?

If you already have a playset in your backyard and you need to level it, the process is not quite as simple. Depending on how out of level it playset is and how heavy it is, you may be able to get some help to lift the playset and add something like the Level Dry Block beneath it, but in most cases, it will not be that simple.
To level the playset, you may have to it apart, move it out of the way, level the ground, and put it back together, or prepare ground elsewhere and move it to the new location.
The good news is you don’t have to take the whole thing apart to move it. At
minimum, you will need to remove any accessories, the swing beam, and the
slide.
As for the rest of the playset, you only need to break it down into chunks that you and anyone helping you can carry. It can be far easier than you’d think.
What about a Steep Slope?
If your backyard has a steep slope or a leveling situation that you don’t feel comfortable tackling, there are still some playset options you could pursue.
Playset Dealer
Some playset dealers have designs that are made to sit on unlevel ground or that are easily customized to handle a sloping yard. Rainbow Play Systems, for example, has developed swing set ladder and A-frames that can be installed on uneven ground.
Custom Designed Playset
Nothing will fit your backyard the way a custom designed playset will, and a custom design doesn’t always cost much more than a stock playset, especially if you add in the cost of hiring a landscaper to level your yard.
Have the Yard Leveled
This option is not for everyone because it does not fit many family’s budgets, but it is something to consider.
You can hire a professional to build up your yard and add a heavy-duty retaining wall for a pretty penny. Backyard leveling can easily cost upwards of $5,000 and depending on the slope of your lawn and the work required, it can go much higher.
If you are looking for ways to invest in your home, this could be an option for you. Turning your sloping backyard into a more level space makes it more usable and more attractive, and it will add value to your home in the long run.