Whether you’re investing in a playset or already own one, the first thing you always think about is the safety of your kids. You want to make sure that if they happen to fall, there’s some sort of cushion and they don’t hurt themselves. Especially if you have an active child, like mine, who loves to do stunts!
So, how do you mulch a playset?
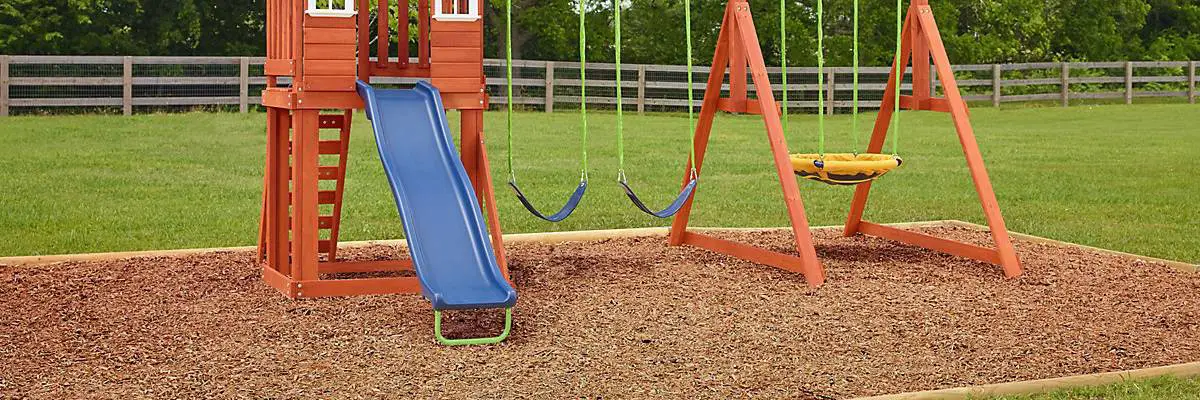
- Create a perimeter around the playset.
- Measure the height of the playset to determine the fall height.
- Remove all grass, plants and other debris inside the perimeter.
- Lay down weed fabric.
- Fill in with mulch.
These are the basic steps that you need to do in order to mulch around your playset. Just make sure that the area where the playset is has proper drainage, otherwise, the materials you choose will not last long and you’ll end up having to replace it sooner rather than later.
Related: How Long Do Swing Sets Last?
How to Mulch Around the Playset:

Step 1. Create A Perimeter Around the Playset:
You want to start by creating a boundary around the playset. According to the U.S. Consumer Product Safety Commission, there should be a distance of 6 feet around each structure and 12 feet of the play area by the swings on both sides. Basically, enough room so that if they fall further than the playset, they still have some surface area to cushion their fall.
Once you’ve determined your safe distance, create a frame using wood or rubber landscape timber. This will help with making sure that the mulch stays within that area. Otherwise, it will be all over the place and you really don’t want that.
Having said that, it doesn’t mean that the mulch still won’t be tracked around, but it will be on a minimal level.
Step 2. Measure the Height of Playset to Determine Fall Height:
Now, what you want to do is measure the height from the platform of the topmost deck, that your child/ren can stand on, to the ground. This is your fall height.
Again, according to the U.S. Consumer Product Safety Commission, this height should not exceed more than 8 feet or the combined height of your child/ren and the platform should not be more than 12 feet, especially if you have children under the age of 3 playing on the playset.
Once you have this height, the next thing is to determine how much mulch you will need. The recommended height of the mulch is 9 inches. But, to be on the safe side, you want to put down 12 inches of mulch because, over time, wood chips tend to pack down and deteriorate.
Step 3. Remove All Grass, Plants and Other Debris Inside the Perimeter:

This is a necessary step in order to make sure that nothing grows through the mulch. This can cause some issues with pests and rotting of the mulch. So, you want to make sure that you start with a clean dirt area.
If need be, use weed killer to get kill the weeds and grass in the area. Then you can dig it up to prepare the ground to receive the required amount of mulch. This will not only help with leveling the ground, but it will be helpful in making sure that there is enough room for you to lay down the 12 inches of mulch.
Step 4. Lay Down Weed Fabric:
Weed fabric, also known as landscaping fabric, is an eco-friendly fabric that is laid down right before you put down the mulch. The fabric is porous hence, it helps the moisture and heat escape from the ground.
The purpose of having this fabric is to prevent any mushrooms or grass or weed to grow in the playground area.
This is, in my opinion, a step based on personal preference. You can lay down the fabric and it will provide extra protection between the ground and the mulch. This can, in turn, elongate the life of the mulch. Meaning, it will help curb its deterioration rate.
If you don’t use the fabric, then the added advantage is that once your kids grow up and are no longer using the playset, you can use that area as a garden.
You’ll have a nutrient-rich soil with at least a decade of organic nutrient-rich material has been breaking down, if you’ve used organic mulch, which, by the way, is highly recommended to use.
The disadvantage would be that you might have to maintain the mulch on a weekly basis. This means looking around the mulched playground area and uprooting any grass, mushrooms or weed that have found their way to the surface. This may not happen, but better be safe than sorry and always check for the safety of your kids.
Another thing that laying down the fabric helps with is preventing mold and fungus from growing on the wood chips. If this does occur, just remove those wood chips immediately and replace them with new wood chips.
Please remember to always wear gloves when dealing with these things.
Step 5. Fill in With Mulch:

This is the final step. Fill the area you’ve created around the playground with mulch. These can be wood chips or other materials, discussed below.
If you are using wood chips, make sure that you do not pack them down. Just set them on top, loosely. As your kids play, the wood chips will start to settle and pack down anyway, so no need to help it along.
There are many kinds of wood chips you can use, example cedar, redwood, etc. Please make sure that you use organic and non-chemically treated wood chips. Especially, when using it an area where your kids will frequent.
The advantage of using wood chips as your mulch is that it’s inexpensive compared to other materials. It’s low-maintenance and it’s a natural material so it will be good for your yard in the long run and it looks aesthetically pleasing.
The disadvantages of using wood chips are that your child/ren can get splinters from the wood. Additionally, they can get stuck in your child/ren’s clothes and shoes and they can bring it home giving you an extra chore of cleaning it up.
You also have to make sure that you top off the wood chips every couple of years as I mentioned above, wood chips have a tendency to settle and compact as they breakdown and that reduces the height of the coverage.
What Are Other Types of Protective Surfaces:
1. Pea Gravel:
This is another natural material that can be used to provide a safe cushion for a fall. However, unlike the wood chips mulch this isn’t as soft and so will not provide a soft-landing cushion if there is a fall.
Pea gravel is an inexpensive option and like the wood chips, it is easy to install and does not require a lot of maintenance. On the other hand, it can be a choking hazard for little children who can put in their mouths if you’re not there to supervise.
The most annoying thing that can happen with pea gravel is it can get stuck in your child’s clothing and worst of all shoes. If they then wear those shoes at home and you have wooden floors, then there is a possibility that your floors will get scratched if the gravel is not removed.
2. Rubber Mulch
This is a fairly new option where loose-fill material is concerned. It hasn’t even been used enough to properly know the consequences to the environment by using this non-degradable material.
The pros of using this material are that it provides a very soft-landing cushion then any of the other loose-fill materials (wood chips, pea gravel and sand). It’s low maintenance but you have to make sure that you check areas with the highest play traffic to make sure the surface is still appropriately covered.
The cons of using rubber mulch are; first, it is an expensive option compared to the other loose-fill materials.
Second, it is made from shredded tires or other recycled rubber material. This means that there is a chance that it may contain harmful contaminants. So, make sure that you’re buying your shredded rubber from a trusted company in order to avoid this issue.
On hot days, others have complained that it produces the smell of burning tires, which isn’t pleasant. And to top it all off, rubber is a flammable material so you have to be careful it doesn’t get ignited.
Lastly, always make sure that your kids aren’t allergic to rubber. You don’t want to invest in something that you won’t be able to use long term.
3. Sand
This is a readily available, inexpensive option to use. Sand can also provide a soft-landing from a fall. If you use sand, then it can double as a great play feature for kids. They can dig in it and you can use for all kinds of sensory development games. Sand also looks good in the yard if contained properly.
The cons of using sand are; sand is really fine and light and can easily be blown around if it is windy. I would suggest not using sand if you live in an area that is prone to high winds and rain, like Florida during hurricane season. Wet sand can be really hard to get rid of, think of beach sand and how it sticks to your body and clothes.
Another thing that can be discouraging when using sand is that pets or stray, cats and dogs, can use the sand as their personal lavatory. This can be dangerous because the feces may contain diseases.
4. Poured Rubber

This is similar to rubber tiles. They’re the best option in terms of being low maintenance and providing the best fall cushion for your child. It comes in a variety of colors and because it’s one piece, it’s a safer option for babies and toddlers since they will not be putting any tiny pieces in their mouths.
It also is great if your child is into rollerblading, skateboarding, etc. because this surface is smooth, almost like tar but made from rubber. A good way to get your kids started since the risk of fall and getting hurt is minimal.
This would be the best option if you have a disabled child or family member on a wheelchair who would need access to either play or supervise.
The downfall with this kind of material is that it tends to be the most expensive form of playground cover. Also, you can’t DIY it, you’ll need to hire a trained professional to get this done. They will measure the fall height and determine how much poured rubber you will need. The ratio is the same as other mulch, the farther the fall the thicker the layer.
Same as shredded rubber, check for allergies to rubber to be on the safe side. You don’t want to spend all that money and have it gone to waste.
5. Rubber Mats or Horse Mats:
These are great for using on their own or combining with other materials for extra support. These are large mats sold in your local hardware stores that people like to use in lieu of any of the other ground cover. It’s a cheaper and low maintenance option.
The way you combine these with other materials is let’s say you have sand on your playground. Then you would lay this on top of the sand under the slide or the swing, anchor it properly and that would provide extra cushion if a fall occurs.
The mats come in a variety of colors, patterns and textures. They’re also easy DIY ground coverage. Just make sure you anchor them at the perimeter so they don’t move. If you fail to do that, then there’s a chance the mats can be a hazard for your kids. They can cause them to trip and hurt themselves.
Same as the other rubber products, check for allergies.
6. Engineered Wood Fiber
This is similar to mulch or wood chips; however, they provide a springier coverage. It lasts about 2 to 3 years and because it is made from wood, it is biodegradable.
If you decide to go with this option, then make sure you verify that it made from virgin wood and not treated wood since treated wood can contain contaminants.
This option is very expensive.
7. Natural Grass:

Most people when purchasing a playset just set it directly in their backyard on the grass. The grass can provide a little bit of cushion for sure, but as the area gets more use, the grass starts to wear out creating bald spots. This can be dangerous.
Also, if you water the grass or if it rains, kids will have to wait until the grass is dry, otherwise they can slip on it or even get dirty and track all that dirt around. Another issue with wet grass is that it can lead to rotting of the playset.
Grass is prone to have bugs and other pests, that can be harmful for children.
This is one option that is high maintenance, since the grass will need cutting and watering and treating for bugs.
8. Artificial Grass:
This option is costly initially, since you have to get it installed by professionals and the turf itself is expensive as well. In the long run though, it can save you lots of money. Since you won’t have to maintain it as much and you will save money on your water bill since no watering of the grass is required.
This option would also be the most aesthetically pleasing choice. Since it will look natural and lush and green all the time.
The downfall of this option is that the turf can get hot in the summertime when it’s exposed to direct sunlight. It can also show signs of wear and tear in areas of high traffic.
How Much Mulch Do You Need?
As I’ve mentioned above, the amount of mulch you need is directly related to the height of the highest platform your kids will stand on when playing on their playset.
U.S. Consumer Product Safety Commission advises that the maximum height from the ground to the platform should not exceed more than 8 feet. And for every 8 feet in height, the thickness of the mulch should be 9 to 12 feet.
If by any chance your height is higher than the required, then be sure to compensate the height of your playset with adding extra thickness to your ground covered by a few inches.
Is One Type of Mulch Better Than the Other?
I have tried to list all the pros and cons for each of the different types of mulch I could come up with. At the end of the day, it is your decision which of these works best for your family.
Do you have to put mulch down? No, you don’t have to do anything. But if your child/ren are actively playing on their playset, then ensuring their safety should be your priority. One thing to always make sure, playsets should not be set on asphalt, concrete or tar. These are extremely hard surfaces and can severely injure your child/ren.