After looking into different playset designs, you probably found yourself thinking “I could build that!” and chances are you can but embarking on such a big project without assistance might be a little daunting.
Luckily there are many DIY playset blueprints, building plans, and ideas available online and in home improvement stores. Building your own playset is a big project, but the results can be amazing, and you will have complete control over the materials and features.
Read on to find out the scoop on DIY playset blueprints, buildings plans, and ideas like how to spot a good plan, some places to find plans, which materials to use, and what the process of building it from scratch looks like.
Related: How To Make A Sandbox Under A Playset
Finding a Good DIY Plan

When perusing the internet for a good DIY playset plan, you will find some amazing, well thought out plans, and some that are clearly not going to withstand the test of time or the rigorous play of your children.
Here are some things you can look for when trying to determine if a plan is offering sound advice or not.
Safety Recommendations
Making sure a plan follows certain safety recommendations is the easiest way to tell if a plan is well thought out. If the plan does not follow even the most basic safety recommendations, it probably has bothered to follow any of the more complex ones.
The recommendations I share below are from the Consumer Product Safety Commission’s Outdoor Home Playground Safety Handbook.
It is important to note this handbook is meant to be a guideline when putting up a playset from a box, not a from scratch playset. The same guidelines hold true, but it does not cover all the recommendations concerning playsets.
The CPSC’s Public Playground Safety Handbook has far more stringent, in-depth guidelines.
Here are some safety recommendations you can look out for:
Open Space: A playset should have 6 feet of open space around it on all side, and the swings should have a distance equal to two times the height of the swing beam in the front and the back.
This means if there is an oversized sandbox under the playset with wood supports holding the sand in, and those supports are only two feet from the bottom of a ladder, the plan is not a safe plan. A child could seriously injure themselves in a fall in this situation.
Belt Swings: The distance between swings that only move forward and backward should not be less than 8 inches. The distance between a swing and the structure keeping the swing in place should be 12 inches. The swing should be 8 inches from the ground.
Swings that Can Move Side to Side: The distance between these swings and the structure holding up the swing set should be 24 inches, and they should be in their own bay.
Openings and Ladder Rungs: All spaces on the playset should either be smaller than 3 ½ inches or greater than 9 inches. This prevents entrapment. The idea is that the openings should be too small for the child to fit through or large enough that they can easily fit through.
Climbing ropes: Climbing ropes should be secured at both ends, and unless you are really into a climbing rope, it might be best to forget it all together as it can present a strangulation hazard.
Railing: Steps should have railing if they go higher than 30 inches or are at an angle greater than 65 degrees.
Diagrams and Photos
A good plan will include diagrams and/or photos of the process of building the playset. Some guides are little more than a blueprint with no instructions on how to tackle the project. This is fine if you are familiar with woodworking, but most of us need a little more direction than that.
List of Materials
A good plan will include a list of the wood and hardware you will need to do the project. It may even include a cut list detailing the sizes all the boards will need to be. This is very helpful and will save you a ton of time.
Customizations
The best DIY playset plans will include ideas and directions on customizations. Some companies will offer this at an extra cost, and some will include it in the cost of the plan. Either way, the ability to swap out features or add on to the playset is priceless.
4 Free DIY Plans

YellaWood Playset
This playset uses an A-frame structure to create a swing set, crow’s nest, slide combination. Yellawood says it takes about 18 hours to complete, but if you’re new to woodwork, it is likely to take longer as they also say it is a high-difficulty project.
The list of tools required are fairly simple and include a saw, a mallet, a drill, some specialty bits, carpenter’s square, clamp and measuring tape. Of course, you would also want some safety goggles and a dust mask while working with the saw.
The instructions are not directed at a beginner, but pictures and diagrams are both provided to help.
The pressure treated wood recommended for this project will hold up over the years, and if you don’t like the look of the plain wood, it can be stained or painted.
Ryobi Playset
The Ryobi Playset is absolutely adorable. It’s quaint and cozy feel would fit in the backyard of many homes. It features a clubhouse with all the details including shutters, planter boxes, and window frames. In addition, it has a rock wall, a ladder and, a large slide and a swing beam.
The instructions for this playset are not aimed at a beginner, but detailed pictures are included which help shed light on everything.
My only safety concern with this playset is that the framing in the window could present an entrapment risk as the openings are about 6 by 8 inches. This could be changed by altering the design of the window slightly.
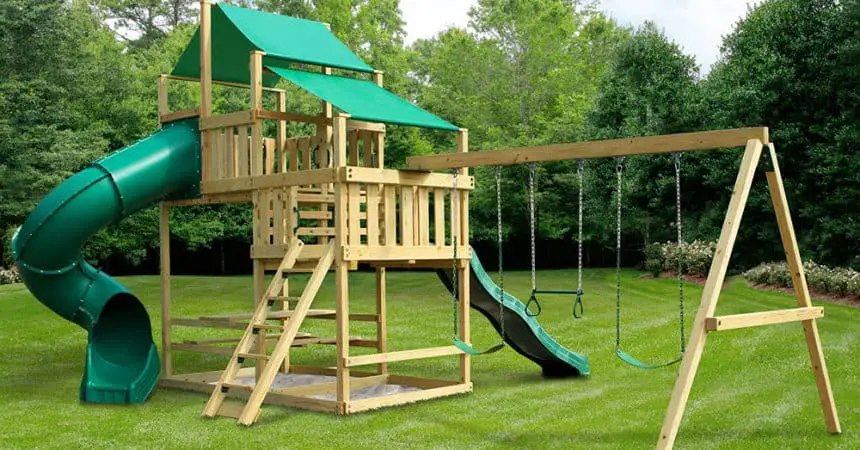
Outdoor Playset
This Outdoor Playset looks like a lot of playsets you would find in a store. It uses an easy to use fabric roof on the clubhouse, and it features a slide, two swings, and a sandbox.
It is pictured with two tires swings that are connected to the swing beam with two chains each. These swings only move forward and back. It would not be suitable for a standard tire swing. You could use typical belt swings in place of their design.
The instructions are not very detailed, but the diagrams clearly show how all the pieces go together.
My Fit It Up Life Playset
This playset is huge and provides so many opportunities for fun. It features a twisty slide, a bridge, a clubhouse, a second high platform, two levels, and a swing set under the bridge.
Instructions are basically just a diagram of the playset, but there are accompanying videos which can be helpful.
There are some safety concerns with this one. Mainly that there is a seemingly decorative fence very near to a ladder that could be dangerous during a fall. In addition, the railing on the end of the bridge is beside several steps which might make it easier for a child to climb up on the railing. These items could be easily altered to make them safer with a little ingenuity.
3 Places to Buy Playset Plans

Plans that you purchase either online or in a home improvement store are often a higher quality than those offered for free, especially as it comes to safety and clear instructions.
Some of the plans available for purchase are sold as a part of a kit which includes some of the hardware and often swing belts.
Paul’s Playhouses
Paul’s Playhouses are stunning. They offer a range of sizes and styles for a range of ages groups. Some features you can expect to include are rock walls, tire swings, multiple clubhouses, bridges, slides, and sandboxes.
They also offer a number of smaller, simpler designs for free on their website. This will give you a feel of how their guides read. Paul’s Playhouses also does custom designs if there is something specific you are looking for. You can ask to alter one of the designs on their website or get a complete custom job.
These plans cost between $40 and $85 for the digital version depending on the complexity of the project. The custom plans cost between $200 and $800. If you’re looking to build something truly amazing, these are the plans for you.
Otterworks USA
Otterworks USA sells inexpensive playset plans that have a modular design. All of their designs can be added on to by using one of their add-on plans. If you’re looking to swap out features, these plans could be for you.
They cost $24.95 and add-ons are an additional $4.99. The playset plans sold through Otterworks USA are simple and exactly what you picture when you think of a backyard playset.
Swing-N-Slide
These Swing-N-Slide playset plans and accessory kits are sold at home improvement stores. The accessory kits usually come with some hardware and swing belts and chains.
These playsets feature everything you could want in a playset including slides, rock walls, canopy roofs, sand, a variety of swings, and rope ladders.
The instruction manual for these playsets is extremely thorough and a great option for a beginner. They provide all the information you will need including pictures of the hardware and tools.
These playsets do not include ways to customize them. The cost of the plan depends on what is included in the kit. They are generally more expensive than a digital plan because they include hardware.
Fun Accessories and Ideas

Even the most basic playset can be enhanced with some exciting accessories.
To save some money, you could try to find some
of these supplies secondhand from people looking to get rid of their old
playsets. Finding an expensive slide can save you big time.
Below is a list of accessory ideas for your playset that you could plan into your design.
Swings
Customizing the swings is usually as easy as detaching one swing and replacing it with another. You can start simple, and if your kids grow bored of one type, you can always try another. Here are some types of swings to look out for:
- Belt Swings
- Trapeze Bar Swing
- Gym Rings
- Tire Swing (require different hardware)
- Toddler Swing
- Tandem Swing
- Nest Swing
- Disc Swing (requires different hardware)
- Standing Swing
- Skateboard Swing
Ways to Climb
Replacing a traditional ladder is a simple way to add a fun new element to the playset. Here are some great options:
- Metal Arch Ladder
- Rock Wall
- Cargo Climbing Net
- Climbing Rope
- Rope Ladder
- Fireman Pole
- Clover Climber
- Tree Climber
- Corkscrew Climber
- Bedrock Climber
- Gangplank
Having an awesome slide can really add pop to your playset. Spiral-style slides are better for tight quarters. Here are some ideas:
- Scoop Slide
- Spiral Slide
- Wave Slide
- Tube Slide
- Double Slide
- Single Turn Slide
- Triple Slide
Odd and Ends
Adding these odd and ends to your playset will add extra fun and charm to the play environment without much extra expense.
- Bell
- Telescope
- Periscope
- Steering Wheel
- Flags
- Megaphone
- Binoculars
- Chalkboard
- Xylophones
- Drums
- Talk Tube
- Tic Tac Toe Spinner
- Water Cannon
- Basketball Hoop (hung on the swing’s A-frame)
- Clock
- Flower boxes
- Furniture/outdoor pillows for the clubhouse
- Solar powered outdoor lights
Big Changes:
These features would require some bigger changes than just swapping out a swing, but they will certainly add to your family’s enjoyment of the playset.
- Monkey Bars or Rings
- Climb through Tunnel
- Zip Lines
- Picnic Table
- Bridges
- Second Clubhouse or Tower
- Sandbox
- Play kitchen
Why Build the Playset from a Plan?

Control: Building a playset from scratch gives the opportunity to select the best of everything without paying the extra costs of working with a high-end playset dealer.
Customization: Different plans offer different levels of customization, but you can easily swap out the straight slide in the plans for one with a twist or a bump. You aren’t locked into any feature.
Memories: Your and your family will always fondly remember the summer you built the playset.
Knowledge: If you build the playset yourself, you will have an intimate knowledge of it. If a piece needs to be replaced, you will have the confidence and know how to replace it.
Cost: If you’re just looking for the lowest priced option, building the playset yourself might not be worth it. The slide alone can easily cost $200, plus the lumber, plus the hardware, plus the accessories. The cheapest option is usually to buy a ready to assemble set and build it yourself.
But if you’re looking at a high-end option, it will definitely cost you less to build a similar product yourself, and you can spend less on areas that aren’t as important to your kids or that you could easily upgrade down the line.
For example, you can choose a basic belt swing instead of a fancy tandem swing if you’re kids aren’t that into swinging.
Fun: Building a playset from scratch can be fun! If you like DIY projects, then you will like constructing a playset for your family to enjoy for years to come.
Wood Types for Playsets
Some playset plans require that you use a certain kind of wood, while others will not specify. Either way, if you are building your playset from scratch, you’re going to need to purchase a lot of wood.
The most commonly used woods for playsets are cedar, redwood, and pressure treated wood.
Pressure Treated Wood
Pressure treated wood is one of the least expensive options to use to build your playset. It is treated with chemicals to help the wood endure outdoor elements.
This is a good feature because it means that your playset will be less likely to decay, and it will not require as much maintenance, but it also isn’t great, because many people prefer not to expose their children to potentially harmful chemicals.
Pressure treated wood used to be made with a very dangerous chemical referred to as Chromated Copper Arsenate or CCA, but in 2003 its use was banned. The pressure treated wood used today is supposed to be a safe option. Still many still prefer to use more natural options.
Before staining pressure treated wood, the treatment must be thoroughly dried. Allow the wood to weather a bit before applying a stain.
Cedar
Cedar is more expensive than pressure treated wood, and it requires yearly maintenance to stay in good condition, but it does not contain any chemicals. Many people prefer the natural look of cedar to the look of pressure treated wood.
Cedar is naturally resistant to insects, rot, and mildew, but that doesn’t mean it is completely impervious to them. It can still be harmed by insects and rot, especially if it is not sealed yearly.
Redwood
Redwood is the most expensive option used to build playsets, but it is for good reasons. Like cedar, it is naturally resistant to insects, rot, and mildew. It does require yearly sealing to prolong the life of the playset.
Redwood also doesn’t warp as much as other types of wood. It is highly durable and strong, and many people enjoy the reddish tones of the beams.
Before You Build the Playset

Before you begin building the playset, you will need to select a location and prepare the ground in that location.
Location
You will want to think through the location of your playset because once it is built, you aren’t really going to want to move it.
Remember that it is recommended that you have 6 feet of open space all around the playset. The swing set requires twice the height of the swing bar in the front of the playset and in the back.
Avoid placing the playset over any of your utilities. If you need to fix or upgrade something, you don’t want to have to take down the playset first.
Be sure that there are no power lines or tree branches in the way of the tallest parts of the playset.
If you can get the playset in some shade, you will be thankful for it on hot summer days.
The area where your playset is located must be level and not prone to getting swampy.
Preparing the Ground
To prepare the ground, first, you will need to mark off the play area with stakes and string.
If your lawn is level already, you can construct the playset on grass, but the recommended ground covering beneath a playset is mulch, rubber mulch, sand, or pea gravel.
If you aren’t going to construct the playset on your grass, remove all the sod and then check to see if the ground is level.
Move the dirt from the higher parts of the play area to the lower parts with a shovel and a garden rake.
Lay down a weed barrier to prevent weeds and grass from growing in your ground covering.
Time to Build
Every playset build is going to be different depending on your particular situation and the playset you are planning to build. Here are some tips for when you are in the middle of construction.
- Read through all the instructions before you begin working on the playset.
- Cut all your boards first and keep them organized.
- You can lightly write the size of the board on one end with a pencil to keep track of which board is which.
- Keep the hardware separated and organized.
- It is going to take more than one day. Take your time to avoid mistakes. Measure twice, cut once!
- Boards are not always the size they say there are. If your board says it is 8 feet long, it could be a quarter inch off, and a quarter inch off can cause problems. Always measure.
- Don’t forget safety goggles, good shoes, and work gloves.
- A respirator mask can keep dust out of your mouth while cutting the boards.
- Try to involve your whole family and building the playset will be a fond memory for everyone.
- On the other hand, if you know having your kids underfoot will frustrate you, send them to the grandparents for the weekend!
- You will need at least one other person to help you hold boards in place or stabilized the structure as you build it.
Choose Your Ground Cover

Whatever ground cover you choose, find a location that sells it in bulk. It is going to cost significantly less to purchase it in bulk.
The CPSC recommends 9 inches of ground covering around a playset in order to help prevent serious injuries from falls. Injury can still occur with any type of ground covering, but these ground coverings have proven to lower the likelihood of life-threatening head injuries.
Mulch is the most common ground cover because it does a great job of preventing injuries from falls. At 9 inches, mulch will help prevent injuries from falls up to 7 feet.
Sand is often used under playsets because it doubles as a sandbox, but it isn’t as effective as mulch at preventing fall-related injuries. It is also messier than other ground coverings.
If you use sand only in a sandbox portion of the playset, you may want to fabricate a cover for the sandbox to keep out animals.
Pea gravel is made of small, smooth stones. They are fun to play in without the same mess as sand, and they are a similar price. Pea gravel only prevents injury from falls at a height of 5 feet. If safety is your concern, mulch is a better choice.
Rubber mulch is the best at preventing injuries, and you only need 6 inches of it to prevent injuries from falls up to 10 feet.
It is the most expensive option, but it does not require maintenance. Newer versions of rubber mulch come in wood-like browns.
Laying the Ground Cover
Before you lay out the ground cover, edge the play area with landscape lumber garden edging, or rubber edging made specifically for playgrounds.
If you already have edging around your flowerbeds or other landscaping, try to match it around your play area to create a finished look.
Rake the ground cover out evenly across the play area.
Unless you use rubber mulch, the ground covering will settle over time by about 25%. If you would like to have 9 inches of ground covering, you will need to lay out 12 inches.
Rubber mats can be used under high impact areas to help prevent injury and preserve the ground covering.
Maintaining your DIY Playset
The maintenance requirements for your playset aren’t too exacting. Here is what you will need to do every year:
- Inspect the playset for insects, rot, mildew, rust, and damage.
- Replace any parts that need it including accessories and hardware
- Clean the playset with soapy water or a pressure washer.
- Sand away any rough spots or splinters.
- Seal the wood on the playset with a water-based sealant.
You are going to want your playset to be around for many years, and with a little maintenance, it could be around for your grandchildren one day.