Have you ever seen a kid swinging and watch the playset shake with the force of their movement? I certainly have, and I have been that kid myself from time to time. As much fun as it might have been as a kid, this movement is not safe, and it is the sign of an unanchored playset.
How to secure a playset to the ground? There are two commonly used methods of securing a playset to the ground: ground anchors and anchoring in concrete. The method you should use depends on the playset you have and if your ground is hard or soft. Some playsets do not require any anchoring.
Anchoring your playset to the ground protects both your children and the playset itself. If you’ve got a playset that needs anchoring, continue reading to find all the information you need to know about how to anchor a playset on any type of ground.
Related: Can You Put A Playset On A Slope?
Why Anchor the Playset

It might seem like overkill when you’re staring at a playset that weighs 400 pounds or more, but anchoring your playset is a very important step in the construction process. You won’t want to skip it, and here is why.
Safety
Safety is the number one reason for anchoring a playset to the ground. If the playset is not anchored, vigorous play from your children or even just swinging high on the swings can cause the playset to tip.
If the playset tips over, it will certainly injure anyone playing on or near the playset. This is a hazard and a liability.
Protects the Playset
If your children manage to tip the playset, it can also cause damage to the playset itself. Even if they don’t tip it, if the playset moves more than it should while your children are playing, it can cause bolts to loosen or it can damage the hardware.
In addition, if you get severe weather in your area, you will want to be certain that your playset isn’t going anywhere. This protects the playset, and also the rest of your property from damage caused by broken pieces of the playset hitting into things.
Warranty
If your playset specifically says that it must be anchored, and you do not anchor it, it could void the warranty.
No Anchor Playsets
Anchoring is a safety feature used to prevent the playset from becoming unstable and tipping over. They also help keep your swing supports on the ground and in place.
Most playsets include anchoring kits in the box with the playset or as a kit that is sold separately. Some recommend anchoring the playset to concrete.
It is hard to imagine a playset that wouldn’t require this safety feature, but surprisingly some playsets are designed to be stable enough that they will not tip. Lifetime playsets and Happy Backyards both make playsets that do not require anchoring, and are good choices if you’re yard does not allow for anchoring.
Whether or not a playset requires anchoring is not an indication of quality. Some manufacturers may claim that only cheap playsets require anchoring, while others claim only the best would provide the safety of an anchoring system.
Neither of these claims is true. What it really comes down to is that some playsets are designed to stand without anchoring, and some are not.
If your playset does not require anchoring, you may want to anchor it anyway. Only you know how vigorously your children play, and certain weather conditions may make you concerned enough to anchor the playset.
The good news is that anchoring your playset will not hurt it. You can anchor it by purchasing an anchoring kit or ground anchoring hardware from a home improvement store. Continue reading to find out about each anchoring method used with playsets.
Ground Anchors

Ground anchors may not look like much, but they are definitely up to the task of holding your playset in place, as long as your ground is not too soft or loose. In fact, ground anchors are commonly used to keep storage sheds, dog kennels, and other outdoor structures stuck to the ground during storms and strong winds.
The appeal of ground anchors is that they are easy to use, and they are not permanent. Eventually, you may want to take down your playset or resell it when your children outgrow it, or you may even want to upgrade it when your kids are bigger. Ground anchors are far easier to remove than concrete.
Overview of Ground Anchors
Twist in ground anchors are very commonly used with playsets. Different anchors have different designs, but the idea is always the same. A stake is hammered or twisted into the ground where it is held tightly by the dirt. It holds the same way a screw holds into a piece of wood.
After the stake is installed in the ground, it is then attached to the playset using screws or bolts.
The stake designs vary. The most common ground anchor has a twisted circle near the bottom that is used to drill the stake into the ground. Others have a corkscrew shape. Some are longer or shorter with different shapes at the end that stick out of the ground and are used to attach the stake to the playset.
Some anchor kits use metal straps to attach the stake to the playset, some screw through a hole in the anchor and into the playset, and some use specially designed anchors with string and a screw that attach to the playset.
You should always use the ground anchors that are recommended in the owner’s manual of your playset unless your ground requires that you anchor the playset in concrete.
If you need to replace an anchor, try to purchase it directly from the manufacturer or dealer where you bought the playset. If that is not possible, get a replacement that is as close to the original as possible.
When to Use Ground Anchors
You can use a ground anchor to hold down just about any kind of playset, but they are generally seen more frequently with wood playsets over metal playsets.
This is because connecting the anchor to the metal base of a metal playset is not as easy as it is with wood. In addition, wooden playset posts should not be attached to concrete, while metal playset posts and legs can be set in concrete without damaging the playset.
If your playset is not meant to be used with ground anchors, you should not use them. Check with your owner’s manual for anchoring recommendations.
If your ground is too soft to hold an anchor, you should not use a ground anchor. Instead, you will need to anchor the playset with concrete. Anchoring with concrete will have the added benefit of keeping your playset from sinking and becoming unlevel and unsafe, which it would be prone to do on soft ground.
Soft soil can be a gardener’s dream, but it is not the easiest place to build and anchor a playset. To test if your soil is hard or soft, trying to hammer a stake into the ground. If the stake drives in easily, your ground is soft. On the other hand, if the ground puts up some resistance to the stake being driven in, your ground is on the harder side.
Ground hardness and softness varies from yard to yard and can even be different in different areas of your yard. Most of the time, the ground is hard enough to hold an anchor.
Not all playsets come with the anchor kits required for proper installation of the playset. Before you buy, you may want to be sure your playset comes with them or that you know what style anchor is recommended.
Supplies Needed for Ground Anchors

In order to anchor your playset using ground anchors, you will not need very many tools. You will probably only need a drill, a hammer, and a wrench.
You will also need a playset anchoring kit or another ground anchoring kit that includes the stakes and the hardware necessary for attaching the anchor to the playset.
How to use Ground Anchors
Part of the appeal of ground anchors is that they are easy to use. The installation process varies depending on the type of anchor that you are using. Be sure to check the instructions that come with your playset or your hardware.
Here is what you can expect for the installation of a ground anchor:
- Do not lay ground cover until after the playset has been completely constructed and anchored to the ground. You want the playset anchored to the ground, not the mulch.
- Be certain that your playset is in the location you want it.
- Check to see if your playset has pre-drilled holes where you need to place the anchor. If it does, you can skip the next step.
- If your playset does not have predrilled holes, you may need to drill some pilot holes depending on the hardware you are using.
- Twist the anchor into the ground near the post you wish to anchor to the ground. You may need to insert the anchor at a 90-degree angle or at a 45-degree angle depending on the style of the anchor.
- If you are having trouble getting the anchor started, you can use a stake and a mallet to push through the sod and the first few inches.
- Additionally, you may want to stick a screwdriver or a stick through the top of the anchor and use it to help you twist it.
- If the anchor doesn’t have the corkscrew design or a twisted circular shape near the bottom, you may need to hammer the anchor into the ground.
- Test the anchor by tugging on it to make sure that it is secure. If your ground is soft, it will not feel secure, and you will need to anchor with concrete instead.
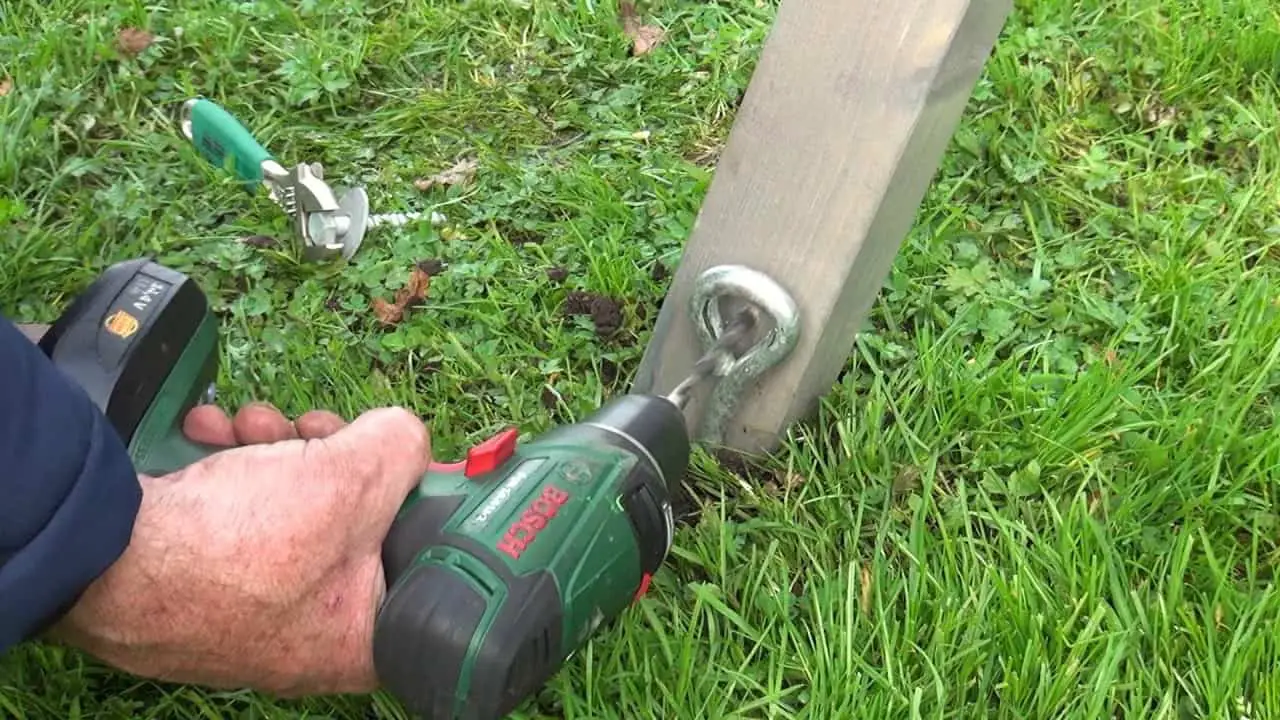
- Attach the anchor to the playset using the hardware provided. Some anchors only require that you drill a screw or fasten a bolt through the eye to attach it to the playset. Others use metal straps looped through the eye which are then attached to the playset.
- Cover the bolt with a bolt cap and cover the area with your preferred ground cover.
- When you inspect your playset every year, be sure to check on the ground anchors to be sure they are still fastened tightly. Also, check to make sure that they are undamaged.
DIY Ground Anchors

While using the ground anchors that are recommended by your playset manufacturer is always a good idea, if you need to DIY it because you’ve built the playset yourself or some other reason, these are still some good options for anchoring a playset to the ground.
Buy a Playset Anchoring Kit
The easiest method is to buy an anchoring kit made especially for playsets. These kits are available at most home improvement stores. They contain the same hardware you might find in the box with your playset pieces.
Playset anchoring kits generally cost between $12 and $24, and they contain
enough supplies to anchor the playset in four places.
Wooden Stakes
Using long wooden stakes with nails to secure them to the playset will get the job done. To use this method, you will need 2” x 4” x 18” pressure treated stakes and 3 ½ inch galvanized nails.
At each of the posts you would like to anchor to the ground, drive one stake into the ground directly beside the post. It should go down at least 12 inches into the ground. Use at least 4 nails per post to secure the stake to the playset.
Stakes should be used to anchor the playset by all of its posts, the legs of the swing set, and the bottoms of any climbing pieces.
This method is not used often because it is not as simple as using a playset ground anchor kit, and there are a number of disadvantages to using it.
First of all, because the stakes stick above the ground about 6 inches, it is slightly less safe than a typical ground anchor because a child could trip over it or fall into it. You can mitigate this issue by covering it with ground cover.
Second, the anchor is more visible with this method because it sticks so far out of the ground, and it doesn’t look as nice.
And finally, it does not save much if any money. The cost of the stakes for this project is usually under $10 and the nails usually cost around $5.
Anchor in Concrete
Anchoring your playset in concrete is a heavy-duty solution. This method will provide a very secure playset for many years to come, but it takes significantly more work and more resources to complete.
Overview of Anchoring in Concrete
Anchoring your playset into concrete is an option commonly used with metal playsets. It is less common with wooden playsets because the process is not as simple with wood. It is not a good idea to put wood, especially untreated wood, into concrete.
Concrete starts wet, and after it has dried, it will soak in moisture from its environment. It passes this moisture to the wood. In this kind of environment, wood is prone to rot, and the last thing you want is for your playset to rot out in the support posts.
To anchor your wooden playset with concrete you will need some additional hardware designed to keep the wood from touching the concrete.
An additional drawback to anchoring your playset with concrete is that it makes it more difficult to move or remove the playset, and you children will eventually grow out of the playset.
When to Anchor a Playset in Concrete

Despite the fact that anchoring a playset into concrete is more work and makes it difficult to relocate the playset down the line, in some circumstances you won’t have a choice.
Some playsets, typically metal, require cement anchoring. If the manufacturer requires you to anchor the playset with cement, there is a reason for it, and you should follow their recommendation.
Furthermore, if your ground is too soft to hold a ground anchor, then you will also need to anchor the playset with concrete. A concrete base will also help by providing support to the playset to help keep it from sinking and becoming unlevel and unsafe, which is more likely to happen on soft ground.
Supplies Need to Anchor a Playset in Concrete
- Landscape paint or stakes
- Galvanized wood to concrete base
- Bricks
- Bolts or screws
- Fast setting, quick dry cement
- Hose/water source
- Shovel
- Post digger (optional)
How to Anchor a Wooden Playset in Concrete
- Mark the locations where each of the posts you need to secure will be located using wooden stakes or landscape paint.
- Dig post holes in the locations that you marked. This is where you will pour the concrete. If you have access to a post digger, it can be very helpful for this. If not, a shovel is adequate. The hole should be approximately 12 inches wide and deep enough to secure your hardware into it.
- Place gravel or a brick in the bottom of the hole for added support and stability.
- Place the galvanized base on top of the brick. The spot on the base where your wood touches the hardware needs to be just above the level of the concrete.
- Check the instructions on your cement to be sure that it can be poured directly into your post hole. Only certain types of cement allow for this. If you cement doesn’t, see instructions below on how to mix cement.
- Pour the fast setting quick-dry cement from the bag into the hole.
- Follow the instructions on the cement as to how to add water to the dry powder. You will likely need at least one gallon of water per pole, but measuring will not be necessary.
- Allow the concrete to dry. This usually takes about 40 minutes with quick dry cement, but it will take 24-48 hours with other cement types.
- Now you can attach the playset to the galvanized bases.
Alternatively, you could attach the galvanized bases to the playset and move everything into place before you put the cement in the holes. You do not have to worry about the playset sinking because the base will sit against the brick in the bottom of the hole.
If you are using pressure treated lumber, you would probably be okay to put your posts directly into the concrete. It is still better not to put the posts directly in the concrete because it will still cause the wood to rot faster, but pressure treated wood can withstand this better than untreated lumber.
Just remember that when you place the playset in the concrete it will sink to the bottom of the hole, shortening the playset as a whole.
Do what makes the most sense for your circumstances and the kind of hardware you chose.
How to Anchor a Metal Playset in Concrete

Many metal playsets need to be anchored in concrete to be safe. Your playset’s instruction manual will give you details on exactly how large your hole should be. Always follow the instructions that came with your playset.
Here is an overview of the process of anchoring a metal playset with concrete:
- Use stakes or landscape paint to mark the location where each pole will sit.
- Dig a hole approximately 12 inches wide and 8 inches deep. Or whatever dimensions are listed in your instruction manual.
- Place a brick in the bottom of the hole for the legs to rest on.
- Put the playset in place in the holes, resting on the bricks.
- Pour the fast setting quick-dry cement into the holes and spray with water. Follow the instructions on the bag of cement. The weight of the playset rests on the brick, so it will not harm the drying process of the cement.
- Allow the concrete to dry. With fast setting quick dry cement, this usually takes about 40 minutes. For regular cement, it takes about 24 hours.
Mixing Concrete
If you decide to use a ready to mix cement instead of the fast setting quick-dry cement, then you will need a wheelbarrow or another large trough for mixing. A wheelbarrow works well because it can be tipped to dump out heavy concrete.
Hand mixing concrete in small batches is not difficult. Renting a cement mixer is possible if you do not wish to hand mix it, but for a small job, it is more machinery than necessary.
To make the concrete, empty the bag of cement into the wheelbarrow and mix it with water using a shovel or trowel. The amount of water you need will be listed on the back of the bag of cement. Generally, you want the concrete to have a thick, soupy consistency.
Make sure you mix the concrete well and that there is no dry cement at the bottom or along the sides of the wheelbarrow.
When working with concrete, you may wish to wear gloves as concrete is very drying to skin.
How to Secure Your Playset in Preparation for a Storm

If you get severe weather where you live in the form of hurricanes, tornadoes, or high windstorms, then you will definitely want to give your playset the best chances of surviving the storm by taking a few precautions.
Luckily, most playsets hold up pretty well in severe weather conditions, especially if you take the time to prepare them before severe weather.
First of all, you need to make sure that your playset is level on the ground. In a high wind situation, an unlevel playset is far more likely to tip than a level one.
You also need to make sure that the playset is anchored to the ground in all the locations suggested by the manufacturer.
Check to make sure that your slide does not require any extra anchoring. If the wind catches the underside of the slide, it could lift the slide off the ground and damage it.
Before the Storm
- Before a storm, remove the canopy from the roof. The canopy is one of the most commonly damaged items on a playset during a storm.
- Take down the swings and bring them inside. Removing the swings is easy on most playsets.
- Check all the anchors to be sure that they are tight and ready to keep your playset secure.
- If you have a sandbox with a lid on it under the playset, be sure that the lid is tightly latched or otherwise secure, so it does not blow away.
- Remove any toys that may have snuck into the playset as they could be swept away in a storm.
After the Storm
After the storm, inspect your playset carefully and ensure that no damage occurred. Check to make sure all the bolts and anchors are still tight and rehang all of the accessories and the canopy before you let your children play on it.