If you have a playset in your backyard or even if you don’t, you know how hard it is to entertain kids. Especially, if you’re competing with their electronics. Sometimes, even having a playset can get boring. The same old swing set, same old slide. So, it’s time to revamp your backyard with some great DIY projects to bring some excitement into your child’s life.
Below is a list of 25 DIY projects ranging from simple playset ideas (for those that don’t have a playset) to some unique stand-alone playground features. So, get your wallets and tools ready and let’s get to it!
Related: How to Keep Wasps Away from Playsets
DIY Playsets:

I wanted to compile a list of DIY playsets that are sure to WOW your child/ren. These playsets range from simple to really elaborate ones. If you’re looking for a way to spruce up the backyard to attract the kiddos, then any of these will work wonders.
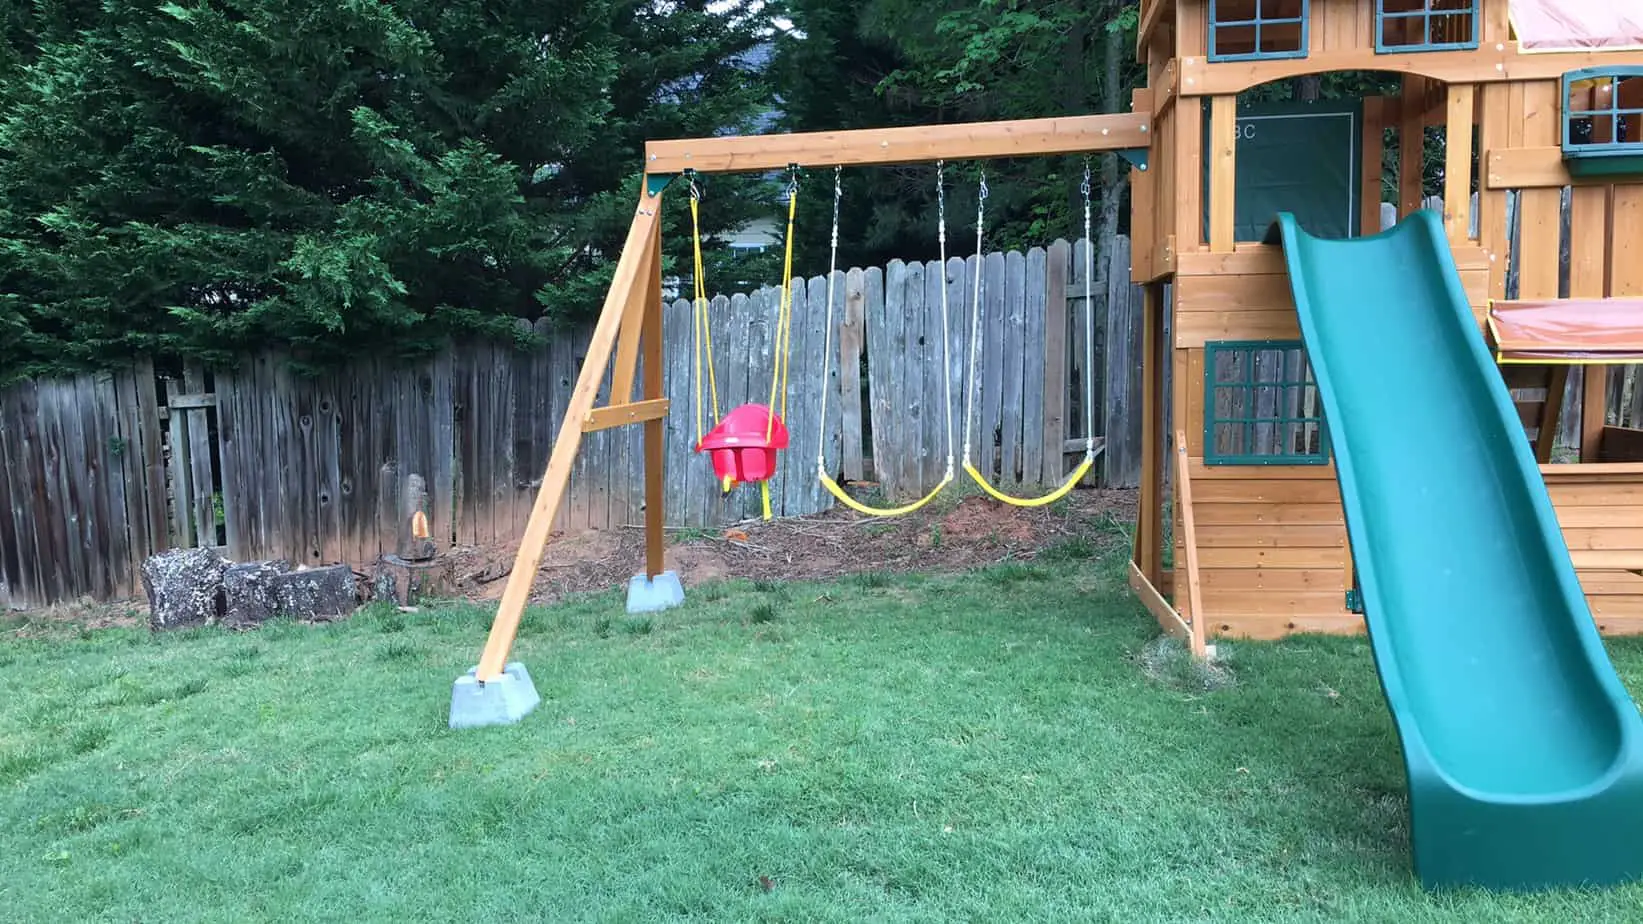
1. Simple A-Frame Swing Set:
I wanted to start out by providing the simplest design I could find.
This is a free-standing A-frame with 3 swings. Simple, easy, inexpensive (compared to other quality playsets out there) and you can get it done in a day.
The swing set can be utilized by kids of any age. The only thing you have to do if using for infants and toddlers is change out the type of swing seat you use. Instead of using belt swings you should use bucket swings.
Or you can be creative with the kind of swing you use. I have a few examples below.
Features:
- 3 swings
Tutorial:
The tutorial can be found here.
They have done a splendid job on explaining everything in this simple step by step with pictures and blueprints of how to construct it.
They have clearly listed all the tools and materials you will need each step of the way.
Variations:
The thing I like about this guide is that you can construct the frame then you can customize it to your liking by changing out the swings. You can either attach customs swings or any other swing you like.
2. Combination Swing Set, Playhouse and Climbing Wall

This is another great project I really loved. The way it’s constructed is just smart and utilizes the space beautifully.
This would be a great upgrade from the playset above. This just gives you a little something extra especially if you have kids who are interesting in rock climbing. This can provide great practice for them.
And when they are tired, they can relax in a cozy nook created between the climbing wall and the anchor wall.
Features:
- 1 swing set
- Rock wall
- Playhouse
Tutorial:
The tutorial for this project can be found here.
The great thing about this tutorial is that it comes with a video guide and a written guide. So, if you’re more of a visual person, then the video would be perfect for you.
They have done a wonderful job of listing all the instructions, down to if you need extra hands to complete a certain part.
Once again, all the tools and supplies have been listed for your ease if you want to replicate it.
Variations:
To make this project your own, once again you are at liberty to pick your own design elements, i.e. the swing, the rock climbing holds and you can decorate the inside of the playhouse however you and your child want.
If you are handy and understand construction, you might want to try and see if you can elongate the swing beam to fit two swings instead of one.
I am no expert so I can’t give you any directions on how to do that.
3. Playhouse with Slide, Swing and Trapeze Bar
This was by far the most interesting read! The instructions were so detailed and the pictures were depicted perfectly to explain how to construct the playset. Most of all, the instructions not only contain great information but it’s humorous as well.
The other thing I liked about this tutorial is that they talk about what they did wrong and how they fixed it, this way you know not to repeat those same mistakes.
This playset is geared towards ages 1+, since the owners created it for their infant. They then modified it to older kids as well.
Features:
- 2 swings
- 1 trapeze bar with rings
- 1 slide
- 1 clubhouse
- Ladder/ramp
Tutorial:
This tutorial is divided into four parts. Each part has instructions for one portion of the playset. Just click on the part that you want to go to and it will take you to that page.
I have put it all in one place for you so you don’t have to go looking for it.
Part 1: The Tower.
Here they talk about how they constructed the tower with the slide and a ladder to access the clubhouse.
Part 2: The Swing set
Here they walk you through how to create the swing using an A frame.
Part 3: Ramp and Tower changes
This part talks about the changes they had to make once they realized they had constructed the slide area for a one year old and not a toddler.
It goes into detail about how they fixed everything to make it more toddler and older kid friendly.
Part 4: The Roof
The last and final part is how they added the roof to complete the they playset.
4. DIY Clubhouse Playset

This is by far the most attractive playset I have seen. It looks like a little house. The best part of this, I think, is that you can customize the design to suit the gender of your kids.
If you have girls, you can really go all out and make it girly. Likewise, if you have all boys then you can make it into a little boy’s club. And if you have both, then I guess you’ll have to go neutral.
Features:
- 3 swings
- A two-story club house
- Tube slide
- Rock wall
- Ladder
Tutorial:
You can find the tutorial, for this awesome play house, here.
The great thing about this tutorial is that it provides you with a PDF documents that lists all the supplies, tools, the sizes of the lumber pieces and the step by step guide all in one place.
They have done a decent job of explaining how to put everything together. However, this is an expensive build. I believe I read in one of the comments that the blogger spent upwards of $1300 to build this playset from scratch.
5. Playhouse of Your Dreams
This is a playhouse with all the bells and whistles.
If you’re good with woodworking and have the tools, then this would be a great project for you! The playhouse has some great features that is sure to entertain your kids for hours.
The great thing that I found about this tutorial is that they also show you how to restore the playset, which they did after 6 years. You can find that tutorial here.
Features:
- 2 Towers
- A bridge
- A playhouse
- Pergola deck
- 2 swings
- A tube slide
Tutorial
You can find there tutorial for this great playset here.
They have PDF files for the step by step guide as well as one for all the materials used. Additionally, they have 3-part videos on how they constructed everything. I felt, though, that you really needed to know a little about construction in order to follow the video completely.
6. Handmade Hideaway
I wanted to include something for that child who doesn’t like to be active much but still wants to be outside.
This is a great little house that they can make their own. Whether it’s their reading nook or even just a cool place to play with their friends.
Features:
- A playhouse
- A Slide
- Ladder
- Railings and Shutters
Tutorial
You can find the tutorial here. The tutorial is divided into four parts. They show you how to make each part of the playhouse so that it’s not overwhelming for you to follow.
One thing to keep in mind, this is not a cheap house to make. But it is a nice little nook, that can be customized and decorated the way your child/ren want.
Sandboxes

Sand is a great way to entertain kids. You can use it to build sand castles or you can use it to hide things and have the kids dig around to find it. Either way, children love to play with sand.
Whether you have a playset already or not, this would be a great addition to your backyard, especially if you have young kids. Sand is great for sensory activities for toddlers.
Below are some really great sandbox ideas that is sure to make your yard stand out.
7. Wood Sandbox
Whether you’re a beginner or an experienced crafter/DIY-er. Anyone can make this sandbox. The simplicity of the design is what makes this a go-to sandbox for beginners and the creativity of wood placement is what attracts the more experienced crafters.
You can find the tutorial for this sandbox here.
8. Sandbox with Lid and Seats
This is another simple idea, but with a creative twist to it. This way when you kids are done playing with the sand, they can simply close the lid.
Having the lid might help with keeping the sand in, especially when it’s windy. This way, you don’t have to keep replenishing the sand.
Another great feature to this sand box is the benches. Kids can sit on the benches while playing with the sand if they don’t want to sit on the sand.
You can find the tutorial for this piece here.
9. Boat Sandbox
Another simple yet, creative idea for a sandbox is to shape it in the form of a boat.
This is great if your kids love ships and boats, especially if you live in an area by the beach or any other water bodies.
Your child/ren can spend at least a few hours playing in their sandbox, and since this one has a shade in the form of sails, so you don’t have to worry about them getting direct exposure to the sun.
You can find that tutorial here.
Swings:
Swings are the life of a playset. If all else fails, choose the swing. I don’t know what it is about the back and forth motion. But kids love swinging. So, instead of the same old swings, if you’re looking to revamp your swing set, then check these DIY swing seats. I am sure your kids will not want to go back to the old belt swings.
Also, as a bonus, I have included an adult version of the swing set, I mean why not? And I also, found a swing set that generates electricity so I thought to include that here as well. In case, you’re into that sort of thing!
10. Airplane Swing
This is a fun interpretation of a swing and almost a rocking chair combined. This would be ideal for kids between the ages of 3 to 6 because they can hold on to the swing. If the kids are younger then you might have to be there to supervise to make sure they don’t fall.
On the other hand, if your child goes through a growth spurt, then you might have to look for another option sooner rather than later.
So, even though this looks great, don’t expect to keep it for long. Here’s how this swing set was made.
11. Platform Swing
This is a great swing choice if you have multiple kids. This way at least 2 kids can fit on it so no fighting about who goes first. Now, if you have more than 2 kids, then I guess you’re just going to have to build another one!
This swing not only looks fun to swing on but it also looks fun to sleep on. The possibilities are endless.
The only negative is that, you can’t swing too high on this one!
Here’s the tutorial.
12. Baby Tree Swing

This swing is so adorable. It looks very architectural and unique. A great addition to any swing set. This would be a great DIY for the infant or toddler in your life instead of the regular plastic seat.
And once your toddler grows out of the seat, I think you can tweak it a little to remove the belt and handle bar and use it as a regular swing seat.
You can find the tutorial for this cute swing seat here.
13. Tire Swing
Have an old tire lying around somewhere? Why not make it into a fun swing for your child instead of throwing it out? This way you’re not only making something exciting for you child but you’re helping the environment in return by recycling.
You can easily customize this by painting it in your choice of color. And if you feel creative, you can even draw flowers or other patterns.
Here is the tutorial for this swing idea.
14. Baby Cloth Swing
If you’re more into the chic and elegant looking things, even playsets, then this is for you.
This is a cute, shabby chic, fabric swing made for a baby and gentle use. Besides, babies aren’t meant to be swung hard anyway.
On the plus side, you can pick out your own fabric pattern and color combination. And this swing can also be a great place for photo opportunities. I mean, let’s be honest, who doesn’t have a gazillion and one picture of their child.
You can find the tutorial here.
15. Disk Swing
This is another fun idea for a swing. Geared more for the older kids of course.
They can swing on it while standing or while sitting. It’s just a fun swing interpretation.
A variation I have seen with this kind of a swing is leaving the rope at the bottom a little longer and tying knots at intervals, going up the rope. This way the swing can double as a rope climb on the bottom.
You can find the tutorial for this swing here.
16. Grown Up Swing Set
Who said kids get to have all the fun? Well, if you have older kids who no longer use their playset or swing set, then you can convert it into an adult version by placing cozy heavy-duty swings that can lift the weight of an adult.
Here is the tutorial I found and fell in love with. Think of late Spring and early Fall. Sleeping under the stars, need I go on!
17. Electric Generating Swing Set
I am including this here because I found it to be so interesting.
You can save some money on electricity (I think) while your kids play, literally. If you’re ambitious enough to complete this project. It doesn’t generate much electricity but enough to power a few small appliances.
Again, pretty cool huh!
As with all the ideas above, and below, do your research to make sure everything is safe.
You can find this tutorial here.
Rock Climbing Wall

This is a great feature to have in your home. Indoor or outdoor, a climbing wall is sure to make any kid want to get up the couch and start climbing away.
Climbing walls are a great way to introduce your kids to rock climbing. It’s a great form of exercise, especially for the upper body. And if you make a sturdy wall, it’s a great way for you to work out as well.
I found some great DIY plans if you want to create a climbing wall feature for your kids.
18. Climbing Wall and Cargo Net
I really like this DIY because it’s portable. When you’re not using it, you can close it and store it.
The other good thing is that, one side is the climbing wall and the other side is a cargo net. So, you get to experience how to climb both.
You can find the tutorial here.
19. City Scape Climbing Wall
This is super cool climbing wall. Great for attracting the kids.
You can customize with whatever mural you want. Or, you can just paint it in one color, if you’re not the artsy sort. Better yet, get your kids involved and let them paint what they want, after all, it is going to be their wall.
You can find the tutorial for this climbing wall here.
20. Rock Climbing Wall
This is the last climbing wall I thought I should include here. These walls are pretty standard and so I decided to pick three unique designs so that I am not repeating the DIY.
The reason I picked this wall was because of the style and the way it is made. It’s almost reminiscent of a rock climb. The person that built the wall is a rock climber and this is his way of making this available to him all day, every day.
Just remember, to get some great cushions for under the wall to cushion your child in case they fall.
You can find the tutorial for this wall here.
Other Stand Alone Play Structures
These are some awesome DIY structures that I wanted to include in this list as well. Sometimes, you need to add a little pizzazz to your backyard playground to attract your picky kids.
It’s not all about the playset, you need to give your kids a little variety so that they can do something else when they tired of the same old playset.
On the other hand, if you don’t have a playset these stand-alone structures can provide the same amount of fun for your kids that a play set would provide, if not more. This way they have more variety of items to play with.
21. Four-In-A-Row Backyard Game
As a child, and now as an adult, I always loved this game. Let me tell you, we can get a little competitive when it comes to playing this game. So, you know when I saw this, I had to include it here.
This is a life size version of the game. Your kids can enjoy this game, you can enjoy this game with them, if you have guests, they can enjoy this game as well. Just an all-around game.
Here is the tutorial for this awesome game.
22. Rolling Pipe Slide
This is another unique idea. Instead of the traditional tube or wavy slide, this is a slide made up of rolling pipes, like the name suggests. It’s similar to a conveyer belt, but in the form of a slide.
I feel like this would be more interesting to kids then a regular slide that they can use at a park or in their playhouse if they have one. This slide has its own charm.
Here is the tutorial for this slide.
23. Sew-Saw
Another classic I remember playing when I was a kid. Lately though, it’s been hard to spot one of these things.
As soon as I saw this, I had to include it on the list. It’s a really fun game for kids to enjoy. I am sure they will love it and have great fun playing with it.
Here is the tutorial for the seesaw. The good thing is that they have a video tutorial so that it’s easy for anyone to make.
24. Hop Scotch
One more classic game that we need to make more known to our kids. This is a fun game with so many variations to the rules.
I remember playing this on the sidewalk, where we had drawn the squares using chalk. This is a more upcycled version of hop scotch made using pavers.
One thing I would make sure of when placing the completed project on the ground, in the yard, is that make sure the ground is leveled. You don’t want the pavers to be wobbly and your kids falling and hurting themselves because of that.
Here is the tutorial for this DIY.
25. Inground Trampoline
I wanted to include this, because I thought this was just a genius idea. This way no one is falling on the ground from great heights.
This might be a bit tricky to DIY, especially if you have a small yard, but maybe you could use a smaller trampoline.
Either way, here is the tutorial for this great idea.
Other Ideas:
I found a guide online with 150 playground ideas and plans that I wanted to include here. This is a website for an organization that builds playgrounds for underprivileged children using tires and other common recyclable items. There are some great ideas including tire bridges, planters, sandboxes, etc.
They show you how to use things we would normally throw away, and make it into a beautiful back yard that the kids can enjoy. I thought this was a great cause and a great resource to have in case you find something you like. You can find this awesome resource here.